This post describes how to prepare the Domain Controller (DC) for the attack scenario with AS2Go v2.6Assuming you already setup an Active Directory you have to do the following steps on your Domain Controller (DC).
- Create a directory & download files from GitHub
- Create a share
- Create alias (cname) and allow Domain Zone Transfer
- Create dedicated AS2Go Active Directory Groups and Organization Units
- Customizing the PowerShell (PoSH) Script to create a set of users for an demo attack
- Create thousands of Demo Accounts
Create directory and download GitHub package
Create the directory
c:\temp\AS2GoDownload files from my GitHub Prepare Domain Controller ⬈ repository and save them in the previously created directory.
Please do not forget to unblock the download
PS C:\temp\As2Go> Get-ChildItem


    Directory: C:\temp\As2Go


Mode                LastWriteTime         Length Name
----                -------------         ------ ----
-a----       01.12.2022     00:02           4217 AS2Go-admin.jpg
-a----       01.12.2022     00:02           4582 AS2Go-helpdesk.jpg
-a----       01.12.2022     00:02           4698 AS2Go-victim.jpg
-a----       01.12.2022     00:02            128 my-passwords.txt
-a----       01.12.2022     00:02          10892 New-AS2GoOUs.ps1
-a----       01.12.2022     00:02          12764 New-AS2GoUsers.ps1
Create an AD-Backup Share
Needed for the Use Case Data exfiltration over SMB ⬈
To create the AD-Backup share with CHANGE permission run the following command as administrator
net share "AD-Backup=c:\temp\as2go" "/GRANT:Domain Admins,CHANGE" /Remark:"Needed for AS2Go"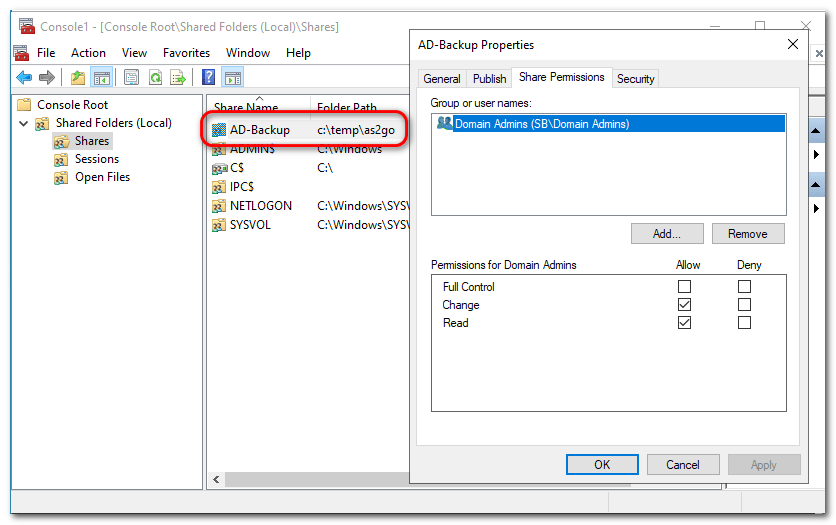
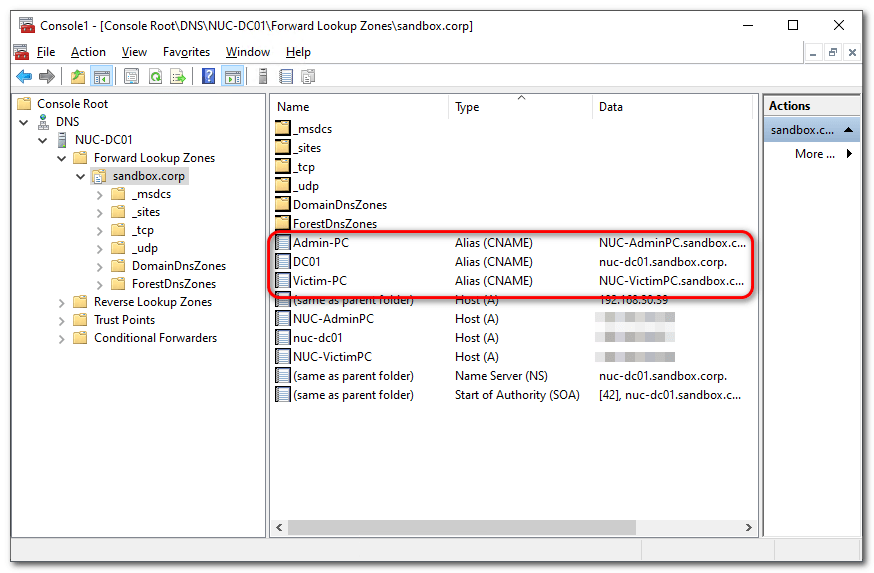
Create alias (CNAME) and allow Domain Zone Transfer
To open the DNS Manager run dnsmgmt.msc.
Alias (CNAME)
To simplify the implementation, please create the following three aliases based on your machines. Because then you do NOT need make major changes in the scripts.
- DC01
- Admin-PC
- Victim-PC
Domain Zone Transfer
To test DNS reconnaissance Domain Zone Transfer must be allowed.
Create dedicated AS2Go Active Directory Groups and Organization Units
To run an attack – dedicated rights are needed. To simplify the setup for each new attack we work with the following three security groups.
- SG-AS2Go-Admins
- SG-AS2Go-HelpDesk
- SG-AS2Go-Victims
To automate the creation, please run the PoSH Script New-AS2GoOUs.ps1 (which you downloaded earlier).
cd C:\temp\AS2GO
.\New-AS2GoOUs.ps1

#if needed modify the Execution Policy before
Set-ExecutionPolicy -ExecutionPolicy unrestricted
The PoSH script created an entire tiering OU structure under AS2GO,
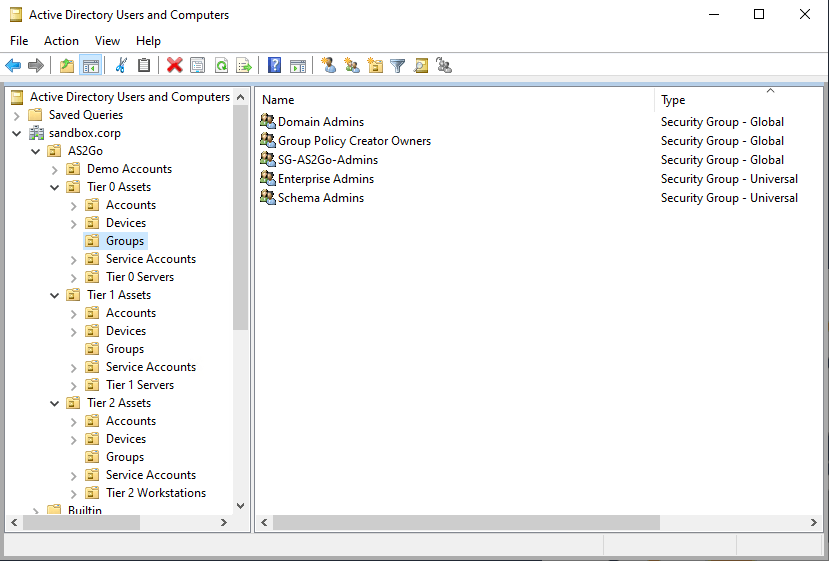
incl. three the dedicated AS2Go AD Groups, which moved directly to the corresponding OU.

Finally set the the DENY right on the OU AS2Go\Tier 0 Assets\Groups for trustee SG-AS2Go-Victims

Adjusting the variables
Necessarily some variables must be adjusted once. Open the New-AS2GoUsers.ps1 PoSH Script and go to:
- Line 79 : UPNSuffix for the new user set
- Line 82: default passwords for every (!) attack, e.g. for the victim PassW0rdvi
# UPNSuffix for new Users
$sUPNSuffix = "@HerrHozi.com"

# Store the user passwords as variables
$master = 'PassW0rd'
$DASecurePass = ConvertTo-SecureString -String $master'da' -AsPlainText -Force
$HDSecurePass = ConvertTo-SecureString -String $master'hd' -AsPlainText -Force
$VISecurePass = ConvertTo-SecureString -String $master'vi' -AsPlainText -Force

# Manager's must exist in the AD
$DAManager = (get-aduser -filter * | Get-Random).samaccountname
$HDManager = (get-aduser -filter * | Get-Random).samaccountname
$VIManager = (get-aduser -filter * | Get-Random).samaccountname

# User thumbnail Photo
$DAPhoto = "$PoSHPath\As2Go-admin.jpg"
$HDPhoto = "$PoSHPath\As2Go-helpdesk.jpg"
$VIPhoto = "$PoSHPath\As2Go-victim.jpg"

# Active Directory Security Groups
$VIGroup       = "SG-AS2Go-Victims"            # member of local admins on VICTIM PC
$HDGroup       = "SG-AS2Go-HelpDesk"           # member of local admins on ADMIN PC & VICTIM PC
$DAGroup       = "SG-AS2Go-Admins"             # member of local admins on ADMIN PC
$DomainAdmins  = (Get-ADGroup -Filter * | where {($_.SID -like "*-512")}).name
$ProtectedUser = (Get-ADGroup -Filter * | where {($_.SID -like "*-525")}).name
After saving the changes test the PoSH Script (as administrator) with one of the following commands
.\New-AS2GoUsers.ps1
.\New-AS2GoUsers.ps1 -Shortname n
.\New-AS2GoUsers.ps1 -Shortname HerrHozi
Create thousands of Demo Accounts
To create thousands of demo accounts I used from GitHub the RobBrideman – ADImporter ⬈
Before you run the script please modify line 25 and optional line 45
#
# Global variables
#
# User properties
$ou = ""OU=YourOUHere,DC=AC,DC=Local"         # Which OU to create the user in
$initialPassword = "Password1"               # Initial password set for the user
$orgShortName = "AC"                         # This is used to build a user's sAMAccountName
$dnsDomain = "AC.local"                      # Domain is used for e-mail address and UPN
$company = "AC co"                           # Used for the user object's company attribute
$departments = (                             # Departments and associated job titles to assign to the users
                  @{"Name" = "Finance & Accounting"; Positions = ("Manager", "Accountant", "Data Entry")},
                  @{"Name" = "Human Resources"; Positions = ("Manager", "Administrator", "Officer", "Coordinator")},
                  @{"Name" = "Sales"; Positions = ("Manager", "Representative", "Consultant")},
                  @{"Name" = "Marketing"; Positions = ("Manager", "Coordinator", "Assistant", "Specialist")},
                  @{"Name" = "Engineering"; Positions = ("Manager", "Engineer", "Scientist")},
                  @{"Name" = "Consulting"; Positions = ("Manager", "Consultant")},
                  @{"Name" = "IT"; Positions = ("Manager", "Engineer", "Technician")},
                  @{"Name" = "Planning"; Positions = ("Manager", "Engineer")},
                  @{"Name" = "Contracts"; Positions = ("Manager", "Coordinator", "Clerk")},
                  @{"Name" = "Purchasing"; Positions = ("Manager", "Coordinator", "Clerk", "Purchaser")}
               )
[System.Collections.ArrayList]$phoneCountryCodes = @{"NL" = "+31"; "GB" = "+44"; "DE" = "+49"}         # Country codes for the countries used in the address file

# Other parameters
$userCount = 5000                           # How many users to create
After a while you find the new demo accounts under AS2GoDemo Accounts


One thought on “AS2Go | Lab Setup 1/3 | DC”